Note: The logon dialog box is not currently supported on macOS platforms. When connecting on macOS platforms, all required information must be provided by the connection string or DSN.
Some ODBC applications display a logon dialog box when you are connecting to a data source. In these cases, the data source name has already been specified.
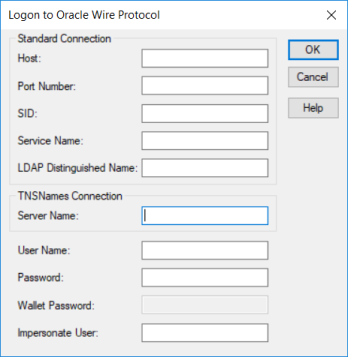
Figure 14. Logon to Oracle Wire Protocol dialog box
In this dialog box, provide the following information:
1. In the Host field, type either the name or the IP address of the server to which you want to connect. Note:
The IP address can be specified in either IPv4 or IPv6 format, or a combination of the two. See "Using IP Addresses" for details concerning these formats.
If you enter a value for this field, the Server Name field is not available.
If you enter a value for the LDAP Distinguished Name field, this field specifies name or address of the LDAP directory server.
This field is not available if you enter a value for the Server Name field.
2. In the Port Number field, type the number of your Oracle listener. Check with your database administrator for the correct number.
If you enter a value for this field, the Server Name field is not available.
If you enter a value for the LDAP Distinguished Name field, this field specifies the port number listener of the LDAP directory server.
This field is not available if you enter a value for the Server Name field.
3. Provide a value for one of the following options:
In the SID field, type the Oracle System Identifier that refers to the instance of Oracle running on the server.
In the Service Name field, type the Oracle service name that specifies the database used for the connection. See "Service Name" in "Connection Option Descriptions" for details.
In the LDAP Distinguished Name field, type the fully qualified path of names in the LDAP directory information tree for the entry containing your connection information.
4. In the Server Name field, type a net service name that exists in the TNSNAMES.ORA file. The corresponding entry in the TNSNAMES.ORA file is used to obtain Host, Port Number, and SID information.
If you enter a value for this field, the Host, Port Number, SID, and Service Name fields are not available.
If you enter a value for either the Host, Port Number, SID, or Service Name fields, this field is not available.
5. If you are using an Oracle Wallet Password Store (AuthenticationMethod=14), in the Oracle Wallet field, type your the password used to access the Oracle Wallet in which your database credential information is stored. Skip to Step 8
6. If required, type your Oracle user name.
7. If required, type your Oracle password.
8. Optionally, in the Impersonate User field, type the proxy user ID used for impersonation. This value determines your identity and permissions when executing queries. Note that the administrator must grant permission to the authenticated user to impersonate the specified proxy user ID.
9. Click OK to log on to the Oracle database installed on the server you specified and to update the values in the Registry.
Note: You can also use OS Authentication to connect to an Oracle database. See "OS Authentication" for details.