On Windows, data sources are stored in the Windows Registry. You can configure and modify data sources through the ODBC Administrator using a driver Setup dialog box, as described in this section.
On Linux, the GUI is not supported.
When the driver is first installed, the values of its connection options are set by default. These values appear on the driver Setup dialog box tabs when you create a new data source. You can change these default values by modifying the data source. In the following procedure, the description of each tab is followed by a table that lists the connection options for that tab and their initial default values. This table links you to a complete description of the options and their connection string attribute equivalents. The connection string attributes are used to override the default values of the data source if you want to change these values at connection time.
To configure a Autonomous REST Connector data source:
1. Start the ODBC Administrator by selecting its icon from the Progress DataDirect for ODBC program group.
2. Select a tab:
User DSN: If you are configuring an existing user data source, select the data source name and click Configure to display the driver Setup dialog box.
If you are configuring a new user data source, click Add to display a list of installed drivers. Select the driver and click Finish to display the driver Setup dialog box.
System DSN: If you are configuring an existing system data source, select the data source name and click Configure to display the driver Setup dialog box.
If you are configuring a new system data source, click Add to display a list of installed drivers. Select the driver and click Finish to display the driver Setup dialog box.
File DSN: If you are configuring an existing file data source, select the data source file and click Configure to display the driver Setup dialog box.
If you are configuring a new file data source, click Add to display a list of installed drivers; then, select a driver. Click Advanced if you want to specify attributes; otherwise, click Next to proceed. Specify a name for the data source and click Next. Verify the data source information; then, click Finish to display the driver Setup dialog box.
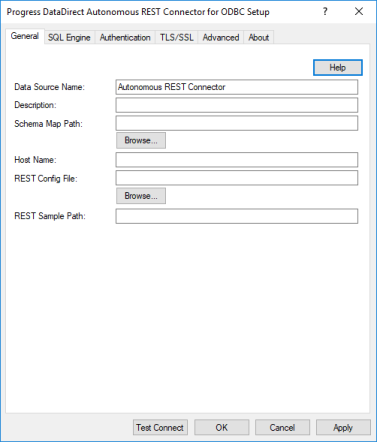
3. The General tab of the Setup dialog box appears by default.
Figure 1. General tab
On this tab, provide values for the options in the following table; then, click Apply. The table provides links to descriptions of the connection options. The General tab displays fields that are required for creating a data source. The fields on all other tabs are optional, unless noted otherwise.
Specifies an optional long description of a data source. This description is not used as a runtime connection attribute, but does appear in the ODBC.INI section of the Registry and in the odbc.ini file.
Specifies the directory where the internal configuration files, REST file, and the relational map of the REST data model are written. The driver looks for these files when connecting to a REST service. If the files do not exist, the driver creates them.
Specifies the host name portion of the HTTP endpoint to which you send requests. This option allows you to define endpoints without storing the host name component in the REST file.
Specifies the name and location of the input REST file used to define your endpoints. This file allows you to specify multiple endpoints, define POST requests, configure paging, or other customizations.
Specifies the endpoint that the driver connects to and samples. This option allows you to configure the driver to issue GET requests to a single endpoint without creating an input REST file.
Default: None
4. To further configure your driver, click on the following tabs. The corresponding sections provide details on the fields specific to each configuration tab:
SQL Engine tab allows you to configure the SQL Engine's behavior.
TLS/SSL tab allows you to configure TLS and SSL settings.
Advanced tab allows you to configure advanced behavior.
5. Click OK. When you click OK, the values you have specified become the defaults when you connect to the data source. You can change these defaults by using this procedure to reconfigure your data source. You can override these defaults by connecting to the data source using a connection string with alternate values.
Note: The Test Connect button only partially confirms that the driver is properly configured. Since REST services lack traditional database structures, you will need to retrieve data from your endpoint to verify that you have successfully connected to your data. The Example application described in "The Example Application" allows you to quickly fetch data from your endpoint, thereby testing your connection.