The following procedure describes how to customize an AppServer broker log file monitor. Use these same general steps to customize a log file monitor for AppServers.
customize an AppServer broker log file monitor:
1. From the grid frame for Resources, click the Edit icon to display the details page for the AppServer broker whose log file monitor you want to customize. See Accessing OpenEdge Management resource information.
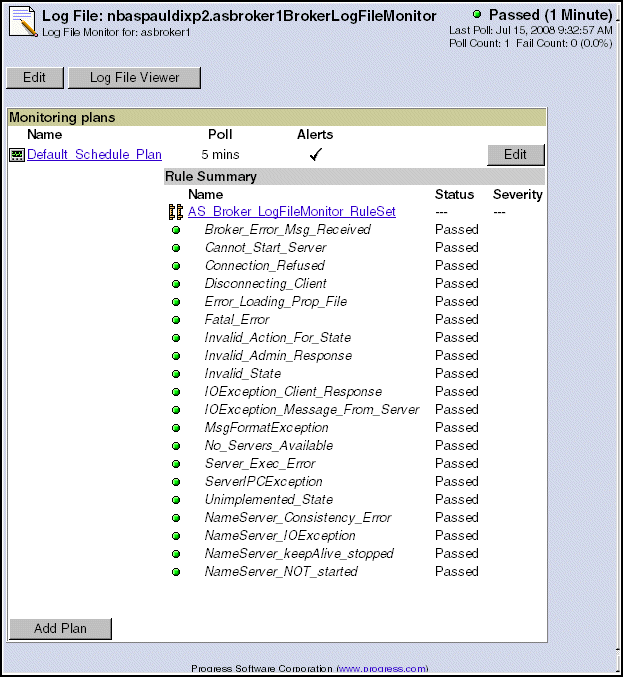
2. Click Log File Monitor of Broker in the Command and control section on the AppServer details page. The Log File Monitor summary monitoring page for the AppServer broker you selected appears:
3. Customize or view the contents of an AppServer broker log file monitor as follows:
a. Click Add Plan to add an existing monitoring plan to this resource monitor.
b. Click Edit at the top of the page to change the description of the log file monitor.
c. Click Log File Viewer at the top of the page to view the contents of the log file monitor.
Note: OpenEdge Management prevents the assignment of schedules that share days or times that overlap. For example, if you have a Default_Schedule set up for a resource monitor, you cannot set up an additional plan because the Default_Schedule is defined for 7 days a week, 24 hours a day. You must modify or remove the Default_Schedule to set up additional plans.
4. To add individual rules, click Edit within the Monitoring plans section to view the edit page for the log file monitor.
5. Click Add Rule under the Rules selected for this plan section of the broker monitoring plan page. You can add a rule that is already defined and/or create a new rule.
6. To use an AppServer broker rule already defined in the library:
a. Select AppServer Broker from the drop-down list associated with the Choose Criteria Category.
b. Select the appropriate value from the drop-down list associated with Choose Search Criteria.
7. To create a new AppServer broker rule:
a. Click Create Criterion to display the Create Search Criterion page.
b. Enter values in the required fields: Name (identifies the name of the search criteria you are creating) and Search Text (identifies the information you are looking for in the log).
c. Select the search type: Literal Search or Regular Expression.
d. Choose whether to use an existing category or use a new category for the rule. Then select the AppServer Broker category.
e. Click Save. The Create Log File Rule page reappears.
The values you defined and selected to create a rule on the Create Search Criterion page are now available on the Create Log File Rule page. The Choose Search Category drop-down list shows the name you entered in the Name field on the Create Search Criterion page. The Choose Criteria Category drop-down list shows the category in which you elected to store the new rule.
8. Select the appropriate values from the Severity and On Alert Action Perform drop-down lists to complete the alert severity and action definition that you want to associate with this rule.
9. Click Save.
10. To add another individual rule, repeat Step 5 through Step 9.
11. Click Select Rule Sets to create a new log file rule or choose from existing rule sets to add to the monitoring plan. If you choose Select Rule Sets, you can pick from a list of predefined rule sets to add to the monitoring plan.
12. Click the AppServer broker instance's link on the breadcrumb trail to display the broker's detail page again.
13. Click Log File Monitor of Broker again to view the new rules updated in the Rules Summary.
For more information about editing search criteria for rules, see the appropriate sections of OpenEdge Management: Resource Monitoring.
Note: You can copy the default AppServer log file rule set, but you cannot delete it.