The Translation Manager tool helps you, as the translation project manager, organize and manage the process of translating the user interface of 4GL applications. This section is an overview of the tasks you must complete using the Translation Manager tool.
The following outline describes the basic tasks involved in preparing an application for translation:
1. Use the Translation Manager tool to create a project database that contains all the information needed to translate the application into one or more target languages.
2. Within the project database, create a list of source procedures—the 4GL procedures in the application you want to translate.
3. Extract text phrases from the selected source procedures and place them in a STRING–XREF file. Specify filters to obtain only those text phrases you want to translate. applications contain user‑interface text (for example, label and ToolTip text) and text for 4GL logic. You usually want to translate only user‑interface text in a source procedure but not string used in the 4GL logic. Then load the text phrases (through the filters to get only the text phrases you want to translate) into the project database.
4. Generate resource procedures—procedures that are shells of the original source procedures, containing the user‑interface objects. Resource procedures do not contain any logic or database‑access information. The translator will use these resource procedures (instead of the source procedures) to translate text phrases in a visual context.
5. Determine the target languages (the languages to which you want to translate) and create a glossary—a table in the project database that contains pairings of source and target phrases—for each target language. The Translation Manager tool includes Microsoft Language Glossaries that you can use to get started. You can also create glossaries specific to your application and to your customer’s needs. For example, you can create a glossary of business or medical terms. You must specify a glossary for each language in the project.
6. Build a kit for each target language:
a. Create a kit database that contains copies of the text phrases to translate and a glossary table from the project database.
b. Generate a compressed (.zip) file for each kit. The compressed file contains a kit database, resource procedures, image files, and an environment (.ini) file that the resource procedures use.
7. Send the kits to the translators.
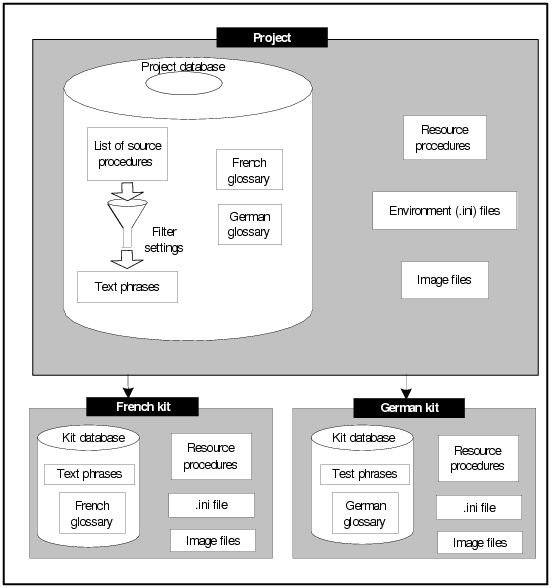
Figure 2–3 illustrates the contents of and relationship between the project database and kits.
Figure 2–3: Projects and kits
The translators translate the text phrases using the Visual Translator tool and, when finished, return the kit database to you. See the “Tasks for the Translator” section for an overview of the translator’s tasks.
The following outline describes the basic tasks involved after the translator returns the kit database that has been translated using the Visual Translator tool:
1. Open (unzip) the returned kit database.
2. Merge the translations from the kit database into the project translation database. You can also merge the custom glossary entries (those entries added by the translator) with the original default glossary.
3. Specify how much you want to expand the space on the interface for the translated text phrases (optional) and compile the source code.
4. Run the source code to determine whether you need to discuss user‑interface changes with the developers or return the kit to the translator to adjust the translations.
5. After making any necessary adjustments, recompile and ship the translated product. You might have a multi‑lingual product or you might have multiple language versions of the same product.