You can track changes in a ProDataSet to extend the sample window dsOrderWin.w and its supporting procedures:
To track changes in the ProDataSet:
1. Save a new version of the window procedure dsOrderWin.w as dsOrderWinUpd.w.
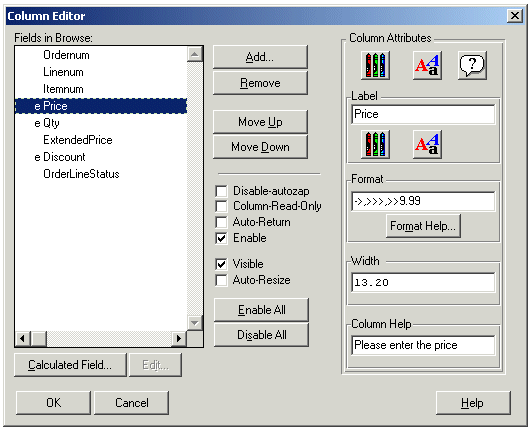
2. Enable the Price, Qty, and Discount columns in the ttOline browse.
To do this, double-click on the browse, choose the Fields button in its property sheet, and double-click on each of the three fields. An ‘e' appears next to each field to indicate that it is now enabled for input, as shown:
You have to define a before-table for the ttOline temp-table. Because this is a static temp-table, its before-table must be defined statically as well.
3. Edit the include file dsOrderTT.i to add the BEFORE-TABLE definition to the temp-table for OrderLines, as shown:
Using this definition, the AVM creates the companion temp-table ttOlineBefore along with ttOline. The two temp-tables share the same scope. You can reference ttOlineBefore in your procedure code just as you can ttOline, but you cannot directly make any changes to its records. The before-table remains empty until you set TRACKING-CHANGES to true for ttOline and start making changes to ttOline records.
You need to set the TRACKING-CHANGES attribute to enable tracking of any updates to the OrderLines.
4. In the LEAVE trigger for field iOrderNum, add a line to set TRACKING-CHANGES to true after receiving an Order ProDataSet back from OrderMain.p. In addition, set TRACKING-CHANGES to false before requesting the ProDataSet, as shown:
RUN OrderMain.p (INPUT iOrderNum, OUTPUT DATASET dsOrder BY-REFERENCE).
TEMP-TABLE ttOline:TRACKING-CHANGES = TRUE.
FIND FIRST ttOrder.
When you set TRACKING-CHANGES to true, you enable the user to change the Price, Qty, and Discount fields of one or more ttOline records and to have those changes recorded in the client window procedure. For each change, the AVM adds a record to ttOlineBefore with the record's values before it was first changed.
To make sure that you can select and view one Order and then another without getting an error that says you are doing a FILL when TRACKING-CHANGES is true, you need to set TRACKING-CHANGES to false before making the call to OrderMain.p.
You need to assign changes made to the browse columns.
5. Define this ROW-LEAVE trigger for the OlineBrowse, as shown:
DO:
DEFINE VARIABLE hCol AS HANDLE NO-UNDO.
IF OlineBrowse:MODIFIED THEN
ASSIGN
INPUT BROWSE OlineBrowse
{&ENABLED-FIELDS-IN-QUERY-OlineBrowse}
/* Disable the Order Number until changes are saved. */
iOrderNum:SENSITIVE IN FRAME dsFrame = FALSE.
END.
In this trigger block, if the browse row has been modified, you assign the list of enabled columns. This is available as the preprocessor value ENABLED-FIELDS-IN-QUERY-OlineBrowse, which allows you to make changes to the list of enabled columns without having to remember to go back to change a hard-coded field list in this trigger.
Once the user has made any changes, you prevent them from switching Orders until the changes have been saved back to the database, by disabling the iOrderNum field.
6. The AVM does not automatically set the MODIFIED browse attribute to false when you switch rows, so you must define a VALUE-CHANGED trigger block for the OlineBrowse, as shown:
DO:
OlineBrowse:MODIFIED = FALSE.
END.
The ROW-LEAVE event fires before the browse switches rows, when you press the up or down arrow or select a different row with the mouse, for example. This lets you capture changes to the current row. The VALUE-CHANGED trigger fires after the browse switches rows, so it would be too late to capture changes to the row you left. All you can do here is reset the MODIFIED attribute in preparation for the next change.
Start to build the trigger code that sends changes back to the database.
7. In the AppBuilder, drop a new button called BtnSave onto the window and label it Save Changes.
8. To illustrate how ROW-STATE and the BEFORE/AFTER-ROWID attributes work, add this code to the CHOOSE trigger for the button:
FOR EACH ttOlineBefore:
FIND ttOline WHERE ROWID(ttOline) = BUFFER ttOlineBefore:AFTER-ROWID.
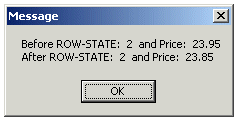
MESSAGE "Before ROW-STATE: " BUFFER ttOlineBefore:ROW-STATE
" and Price: " ttOlineBefore.Price SKIP
"After ROW-STATE: " BUFFER ttOline:ROW-STATE
" and Price: " ttOline.Price.
END.
For each OrderLine that you change, there should be a record in ttOlineBefore. That record points to its companion in ttOline using the AFTER-ROWID attribute. The MESSAGE displays the value of ROW-STATE for each record, along with the Price before and after the change.
9. To try this out, run the window procedure, select an Order, and modify one or two of the Price values of its OrderLines.
10. Choose the Save Changes button.
For each OrderLine you changed, you should see a message like the following for a Price change from 23.95 to 23.85:
This confirms that the ROW-STATE attribute is always set for both the before-table record and the after-table record, so that you can query it starting at either table. The ROW-STATE value of 2 represents the literal ROW-MODIFIED. In the case of a delete, of course, there will be a record with a ROW-STATE of 1 (ROW-DELETED) only in the before-table, and no record in the after-table.
The message also confirms that the before-table record holds the value of the fields before any changes were made, and the after-table holds the modified values.