Once you have started Oracle, started the DataServer processes, and created and connected to a local empty OpenEdge database, you can create the schema image. For information on starting Oracle see Running Oracle. For information on starting the DataServer processes, see Startingthe DataServer processes.
To create a schema image:
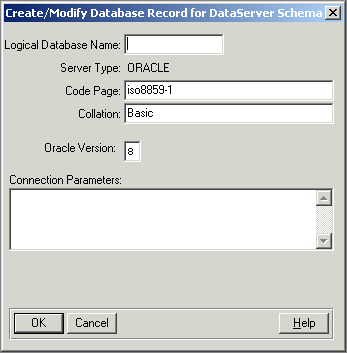
1. From the Windows Data Administration main menu or the character-based Data Dictionary main window, select DataServer > ORACLE Utilities > Create DataServer Schema. The following dialog box appears:
2. Type a logical database name in the Logical Database Name field. You use the logical database name to connect to your Oracle database. You also use it to refer to the database in your programming applications. For more information on database names, see OpenEdge Getting Started: ABL Essentials.
If you are building a schema holder for a distributed Oracle database, the logical name that you choose must be unique across the distributed database.
Note: If you place the schema image from a second non-OpenEdge database into a schema holder, you must give the second schema image a different logical database name from the first schema. The schema holder has one physical name, but each schema image it contains must have a different logical name.
3. In the Code Page field, type the name of the code page for the schema image. The name must be the OpenEdge name for the code page.
If you choose UTF-8 as the schema image code page, your schema holder's code page must also be UTF-8. If your Oracle environment uses a code page that OpenEdge does not support, you must supply a conversion table that translates between the OpenEdge client code page and the code page that Oracle uses.
See Code pages in for more information on how the DataServer handles code pages and code-page conversion tables. For a complete discussion of code pages, see OpenEdge Development: Internationalizing Applications.
4. In the Collation field, type the name of the collation table.
5. In the Oracle Version field, type the version number of Oracle you are using. Possible values are 8 (the default), 9, or 10g.
6. Type the required connection parameters in the Connection Parameters field.
At a minimum, you need the User ID and Password parameters. Remote connections also require networking parameters. See Connecting a schema holder at startup for a description of the required and optional connection parameters. This is how you identify the Oracle user in an Oracle Networking connection:
-U userid@service-name -P password
7. Choose OK. The utility prompts you to verify the Oracle user ID and password.
8. If you did not specify the User ID (-U) and Password (-P) parameters in the previous dialog box, type an Oracle user ID and password combination that has the privileges required for creating a schema holder.
9. Choose OK. The following dialog box appears:
10. Preselect the objects that the schema holder should contain. You can select these objects by object name, object type, or owner/library. By default, the wild card symbol (*) appears and specifies that the utility selects all objects. Typically, you should not include system-owned objects.
Note: Progress Software Corporation recommends that you do not specify an entry that consists exclusively of wild cards for each of the three entry fields in the dialog box. An entry that consists exclusively of wild cards might degrade the performance of the database when you perform a schema pull. (It will include system catalog files from the data source not typically included in user databases.)
11. Choose OK.
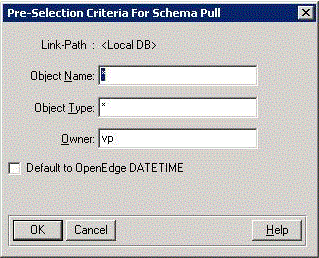
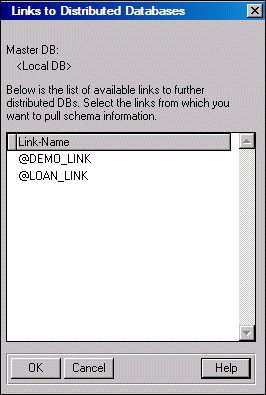
If your Oracle database is part of a distributed database, the Links to Distributed Databases dialog box appears, listing the linked databases that make up the distributed database. Otherwise, go to Step 14.
12. Select the linked databases whose objects you want to include in the schema holder, then choose OK. The Pre-Selection Criteria For Schema Pull dialog box appears. You can select objects by name, type, and owner for a linked database. For example:
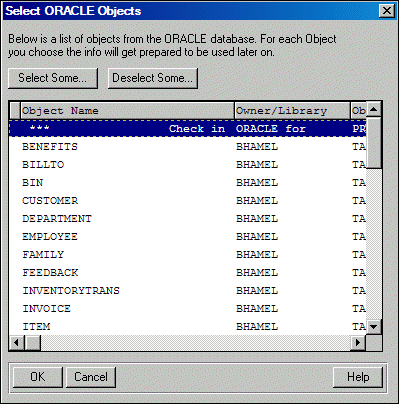
13. Choose OK. The following dialog box appears:
14. Select the objects that you want to include in the schema holder.
Note: If object names repeat across a distributed database, the DataServer qualifies each name by adding -n. For example, if your database has two INVOICE tables, the schema image will list them as INVOICE and INVOICE-1.
15. Choose OK. The DataServer reads information about the database objects and loads the data definitions into the schema holder. The time this process takes depends on the size and number of the Oracle objects.
For each table, the DataServer selects an index or the native ROWID to support the ROWID. If an Oracle object (such as some views) does not support the ROWID function, the DataServer issues the warning, "Please check warnings and messages in the file ds_upd.e." The ds_upd.e file lists the objects that do not support ROWID.
You can change the DataServer's selection by using the Data Dictionary. For example, you can choose to use an alternate integer index or the native ROWID. See Defining the ROWID for instructions and ROWID function for more information on ROWID.
If the DataServer encounters Oracle errors while creating or maintaining schema information or loading data, it displays the Oracle message and message number on screen. See your Oracle documentation for complete descriptions of the error messages.
The DataServer makes an additional connection to the schema holder when it creates, updates, or verifies a schema image. If you are connecting to multiple databases or schema images, make sure that you set the Number of Databases (-h) parameter to a value that accommodates the number of databases and schema images plus one.