1. From the Tasks pane, click the Create Phases and Swim Lanes link in the Design Tasks panel.
2. Click the Swim Lane () icon in the Create Phases and Swim Lanes section.
The New Lane dialog box appears.
3. Enter the ID and Name of the new swim lane in the respective boxes.
4. Click the ellipsis button next to the Performer box to assign a performer to the swim lane.
5. Select the Select a performer option to open the Select a Performer dialog box which displays a list of available performers that you can assign to the swim lane.
Note: You can use the Clear performer option to create a swim lane with no performer assigned to it.
To search a performer (user or group), use the Search box (
) to enter a string of letters to filter the number of users presented in the Performers dialog box—for example, enter “mgr” to show all performers that contain that string of letters in their name. Click
to clear filter criteria from the Search box.
6. Select a user name from those listed in the Select a Performer dialog box, then click OK. You can also add a new performer to those listed (see Defining a user as a performer).
7. Click the Appearance tab to apply a unique color to the swim lane.
8. Select an option from the colors listed. You can also click More to display more color options.
You can also change the color of multiple swim lanes by selecting the lanes and clicking the Color (
) icon in the palette, to open the color palette, where you can select one of the listed colors, or click More to display more color options.
9. Click OK to add a new swim lane for the specified performer to the process template diagram. Move the workstep that this user is performing into its swim lane.
By default, BPM Designer adds a new swim lane below existing swim lanes. You can also insert a swim lane between existing lanes.
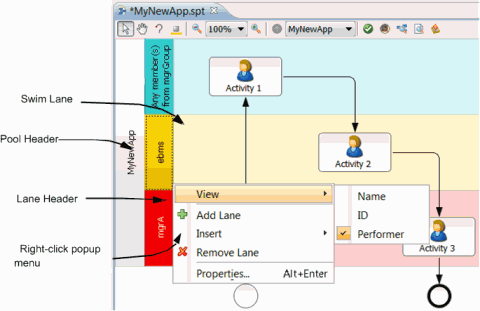
Swim lanes have two headers. The primary Pool Header contains all the swim lanes and displays the name of the Process Model. The Lane Header displays the Name, ID, or Performer of each lane, as determined by selecting one of these options from the View menu in the Lane Popup Menu. The Pool Header remains as a black and white header, but you can define a color for each Swim Lane.
Figure 12. BPM Designer User Interface with Swim Lanes
You can assign the same performer to different swim lanes. You need not have to add all worksteps that have the same performer to the performer’s swim lane; these worksteps can also be placed in that part of the diagram outside the swim lanes.

 ) icon in the Create Phases and Swim Lanes section.
 ) to enter a string of letters to filter the number of users presented in the Performers dialog box—for example, enter “mgr” to show all performers that contain that string of letters in their name. Click
 to clear filter criteria from the Search box.
 ) icon in the palette, to open the color palette, where you can select one of the listed colors, or click More to display more color options.