Open the Business Process Modeler and click File > New > Process Model to create a new process template. The New Process Model wizard opens, where you can provide the required information. Some important attributes are:
Name (Required): Provide a unique model name to identify the new process.
Label: This appears as the title of the process in Business Process Portal. If no Label is provided, then the Name appears as the title.
Group (Optional): If a group is specified, then only the group members can initiate instances of the defined application.
Manager (Optional): The default user who receives any task if an invalid user is given as a performer during an instance creation.
In the Business Process Modeler, defining the process flow includes deciding the types of worksteps, the order in which they occur, and through which types of connections they communicate. You can use the drag-and-drop features of the Business Process Modeler to add worksteps and connectors. For more information, see Designing a process template diagram.
Note that a workstep can have a user, an adapter, or a subprocess as the performer.
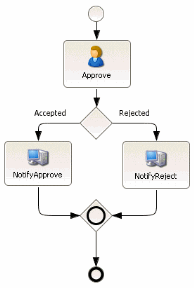
The flow of the process with worksteps identified is illustrated in Figure 12.
Figure 12. Approval - Process Model
1. Request: The requester starts the process, providing necessary information.
2. Approve: The Manager reviews the request and evaluates it for approval.
3. Decision: The Decision gateway represents the choice made in the Approve workstep.
4. NotifyApprove: This workstep sends an e-mail to the employee that the request is approved. You can use a customized Email adapter for this step.
5. NotifyReject: This workstep sends an e-mail to the employee that the request is rejected. You can use a customized Email adapter for this step.
6. Or-Join: This workstep connects two flow paths from NotifyApprove and NotifyReject worksteps to the End workstep.
7. End: This is the final workstep. No attributes are attached to this workstep.