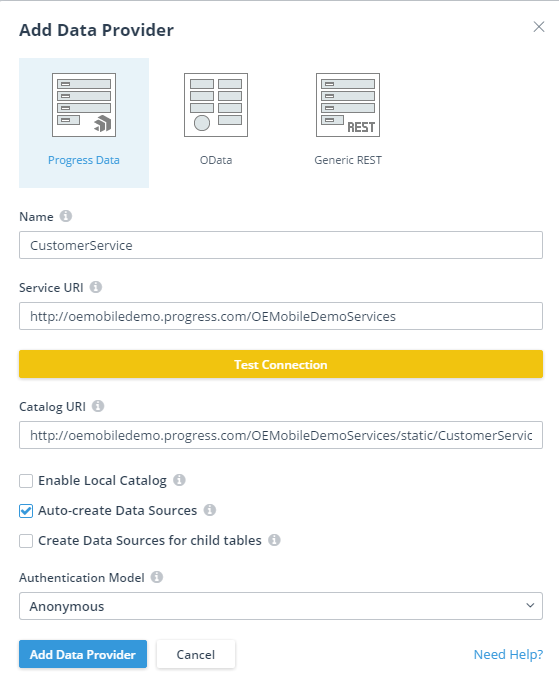
When you create a data provider, by clicking Add Data Provider on the app design page, the Add Data Provider dialog box displays for you to enter its initial definition, as shown in the following example:
Figure 8. Add Data Provider dialog box
In this example, the data provider is defined as a Progress Data Provider, with CustomerService entered as its Name, with the OEMobileDemoServices web application URI specified as its Service URI, and the Catalog URI for the single Data Object Service, CustomerService.json, specified in the Catalog URI field.
Note: If the Service URI specifies a secured web application, you must use an unsecured Catalog URI to work with it in the Designer. You can either specify an unsecured Catalog URI and change it to a secured URI during deployment (see App generation and deployment), or specify the secured URI for the Catalog URI and use a local Catalog for the Designer by selecting Enable Local Catalog, which allows you to browse for and select a Catalog file stored on your file system just for development using the Designer. When you deploy the app, it then uses the secured Catalog URI setting that you have also specified.
Once the Add Data Provider button is clicked, the specified data provider is created with all top-level table resources automatically created as data sources, and with the Authentication Model for the data provider specified as Anonymous. (The other supported options available for a secured data provider are Basic or Form.)
You can otherwise create an OData Provider or a Generic REST Provider as read-write data providers. Where as, a Progress Data Provider can offer read-only or full CRUD data access, with the possibility of transaction support.
Note: For a Progress Data Provider, the Service URI field always specifies the URI of the single server component that provides a connection to the Data Object Service whose Catalog URI is specified in the Catalog URI field, and that server component is always a single web application running on the web server for an OpenEdge application server. Note also that the authentication model specified in the Authentication Model field must be the same as the authentication model configured for the specified web application.
Once you create the data provider, its name appears in the Data Providers list as shown on the example app design page (see Creating and designing an app).
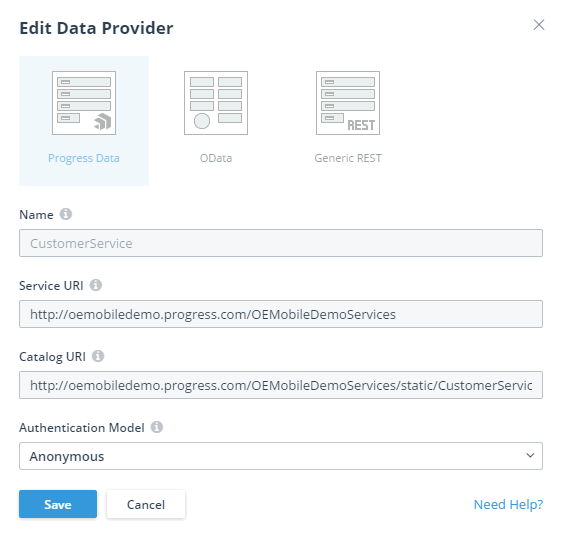
To edit the data provider's properties, such as the authentication model, click the gear icon next to the data provider's name and select Properties.
Figure 9. Edit data provider page
Note: After you create a data provider, you cannot change its specified Provider Type, Name, Service URI, or Catalog URI settings in the Designer. For production deployment and maintenance of your development and QA environments, you can update the specified web application and Data Service Catalog (or Catalogs) by changing appropriate settings in a JavaScript file generated for every generated app build before you access or deploy the web app in a given environment. For more information, see App generation and deployment.
At this point, you might want to review and edit the data sources created for this data provider by clicking the data provider's name in the app design page. Any data sources automatically created for the data provider when you first create it appear in a list under Data Sources. If the Data Object Service specified for Catalog URI supports additional Data Object resource tables, you can manually create new data sources for them by clicking Add Data Source. For more information, see Adding and editing a data source.