This section provides instructions for installing your downloaded files using the GUI installer.
Note: OEM CUSTOMERS: Refer to the Progress DataDirect forJDBC Drivers Distribution Guide for information on installing, branding, unlocking, and distributing your branded drivers.
Note: Make sure that the Java Virtual Machine (JVM) is defined on your path. Java SE 6 or higher is required to use the drivers.
1. Unzip the files to a temporary directory, maintaining the directory structure of the zip file. After extracting the files, the temporary directory should have the following structure:
2. From the installer directory, run the appropriate installer file to start the installer.
Windows: PROGRESS_DATADIRECT_JDBC_INSTALL.exe
Non-Windows: PROGRESS_DATADIRECT_JDBC_INSTALL.jar
Important: The Java installer can be run on most platforms, including Windows; however, if you run the Java installer on Windows, turn off User Account Controls or select a non-system directory as the installation directory. The Windows installer allows you to install the driver in the Program Files system directory on Windows without turning off User Account Controls.
3. The Introduction window appears. Click Next.
4. The License Agreement window appears. Make sure that you read and understand the license agreement. To continue with the installation, select the I accept the terms in the License Agreement option; then, click Next.
5. The Install Directory window appears. In the Where Would You Like to Install? field, type the path, including the drive letter, of the product installation directory or click the Choose button to browse to and select an installation directory. Verify the installation directory. Click Next to continue.
6. Choose the type of installation to perform. Select one of the following options.
Evaluation installation (will expire in 15 days). Select this option to install evaluation versions of all available drivers. Click Next to continue with the installation. Skip to Step 10.
OEM or Licensed installation. Select this option if you have purchased a licensed version of one or multiple drivers. Click Next. If you are updating a currently installed driver, skip to Step 8; otherwise, proceed to the next step.
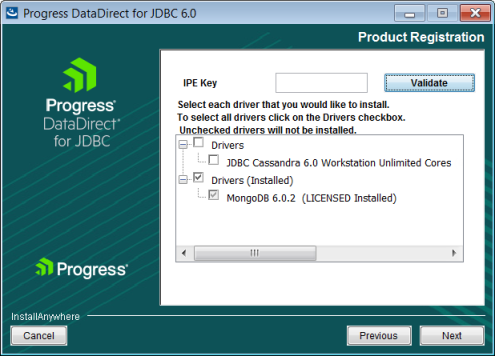
7. Type the IPE key (also known as the Control Number) that was provided by Progress DataDirect in the IPE Key field, and click the Validate button. You can add multiple keys consecutively.
A tree menu of drivers with valid licenses appears in the selection box. For example, the following image demonstrates an Apache Cassandra installation.
8. From the tree menu, select the drivers that you want to install. Click Next to continue.
Drivers that are already installed will be listed under Drivers (Installed) and cannot be deselected. To remove installed drivers, you must uninstall the product.
If you are installing a new version of a currently installed driver, the installer will overwrite the installed driver files with the newer version. To revert to an earlier version of the driver, you will need to uninstall the product and reinstall the desired version. For information on uninstalling drivers, see .
9. Enter name, company, and serial number in the fields provided. Click Next to continue.
a. Type your name and company name into the corresponding fields.
b. Type the serial number that was provided by Progress DataDirect.
c. Verify that the I want to participate box is selected to allow the installer program to gather data for the Installer Customer Experience Improvement Program. Information collected for the program is used to improve our products by identifying trends or issues that impact the user experience. For details, refer to the Progress Privacy Policy.
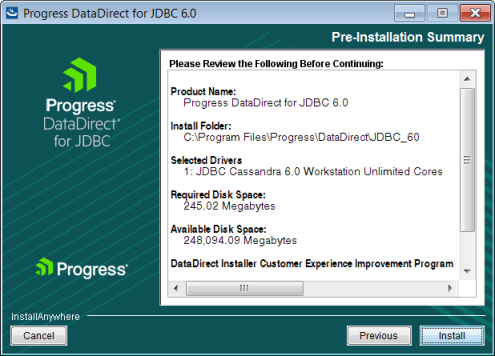
10. The Pre-Installation Summary window appears. Review the installation information. Click Previous to revise selections; or click Install to begin the installation.
11. When the installation finishes, the Install Complete window appears. Click Done to exit the installer program.