After copying the product installation file to a temporary directory, take the following steps to upgrade a load balancer deployment with the installer in GUI mode.
1. From a command-line prompt, navigate to the directory where you saved the product upgrade file. Alternatively, place the product upgrade file directory on your path before proceeding to the next step.
The product file has the format PROGRESS_DATADIRECT_HDP_SERVER_nn_LINUX_64_INSTALL.bin, where nn is the version of the product.
2. Make the file an executable using the chmod command. Then, press ENTER. For example:
c. The Introduction window appears. Click Next to continue.
Note: If the installer cannot continue with a GUI installation, a message is displayed, and the installation continues in console mode.
4. The License Agreement window appears. Make sure that you read and understand the license agreement. To continue with the installation, select the I accept the terms in the License Agreement option; then, click Next.
Note: You can exit the installation program at any time by clicking Cancel or return to the previous window by clicking Previous.
5. Enter or choose the directory of the installation you want to upgrade; then, click Next. A pop-up dialog appears. Click Upgrade to continue.
6. Choose whether you want to upgrade with an evaluation or licensed version of the product. Licensed installations require a valid License Key.
Evaluation. Select this option to upgrade with an evaluation version that is fully functional for 30 days. Then, click Next.
Licensed. Select this option if you purchased a licensed version of the product. Type the license key, including any dashes, and then click Next.
7. Accept the fully qualified hostname for the Hybrid Data Pipeline server. By default, the installer suggests the name of the current machine. Then, click Next.
Note: If the installer is unable to validate the hostname, you are prompted to reenter the hostname or skip validation. Skipping validation is often desired when performing a silent upgrade. See Silent upgrade process for details.
8. Select how you want to continue the upgrade.
Select Express to persist previously established values. Then, click Next and continue at Step 22.
Select Modify settings to change values for the following configurations. Then, click Next.
Change the location of the SSL certificate file
Change the Java configuration to use an external JRE
Enable or disable FIPS
Add MySQL Community Edition as a data store or external system database
Change the system database you are using
Update external system database credentials
Change Server Access Ports
Change On-Premises Connector Ports
Change Server Internal Access Ports
Note: The following elements of an installation cannot be modified when performing an upgrade of a load balancer installation: key location, load balancer hostname, and On-Premises Connector enablement.
Select Use default Java if you will be using the embedded JRE installed with the server.
Select Java home directory and provide the path to an external JRE if you will be using a JRE not installed with the server.
10. Select whether you want to enable FIPS on the Hybrid Data Pipeline server.
Important: To enable FIPS, your hardware must support secure random, or you must have a secure random daemon installed.
Important: When you enable FIPS during an upgrade, the environment uses the encryption key for the system database that was generated during the original installation of the server. This encryption key, while generated with a FIPS compliant algorithm, was not generated with a FIPS certified implementation of the algorithm.
11. Depending on your environment, provide the appropriate SSL certificate information.
Select Certificate file to specify the SSL certificate file to be used with the Hybrid Data Pipeline server. The specified file must be the root certificate used to sign the certificate for the load balancer server. PEM, DER, and Base64 encodings are supported. Type the full path to the certificate file, or click Choose... to browse to the location of the SSL certificate file. Then, click Next.
Select Use existing Certificate to use the SSL certificate specified in the previous installation or bypass the specification of an SSL certificate. Then, click Next.
12. Select MySQL Community Edition if you plan to use MySQL Community Edition as an external system database or as a data source. Hybrid Data Pipeline does not provide a driver for MySQL Community Edition. However, you can use the MySQL Connector/J driver to use MySQL Community Edition as an external system database or as a data source. If you select MySQL Community Edition, enter the name and location of the MySQL Connector/J jar file in the Jar Path field. Then, click Next to continue.
Note: For more information on the MySQL Connector/J driver, refer to the MySQL developer website at https://dev.mysql.com/.
13. Select the type of external database you want to use to store system information from the drop down box. Then, click Next.
c. Select the connection type. Do one of the following:
If you connect using the Oracle System Identifier (SID), select Connect using SID, then type the SID.
Select Connect using Service Name, then type the database service name that specifies the database that is used for the connection. The service name is a string that is the global database name. The global database name typically comprises the database name and domain name.
d. Optionally, in the Advanced Options field, specify additional connection parameters and their values to be included the connection url. Values should be entered as a semicolon-separated list of parameter=value. For example, you may enter to following options to configure SSL:
15. Provide connection information for the MySQL Community Edition database.
a. Type the name of the host.
b. Type the port number.
c. Type the database name.
d. Optionally, in the Advanced Options field, specify additional connection parameters and their values to be included the connection url. Values should be entered as a ampersand-separated list of parameter=value.
16. Provide the SQL Server connection information.
a. Type the name of the host.
b. Type the port number.
c. Type the database name.
d. Type the name of the schema.
e. Optionally, in the Advanced Options field, specify additional connection parameters and their values to be included in the connection URL. Values should be entered as a semicolon-separated list of parameter=value.
17. Provide the PostgreSQL connection information.
a. Type the name of the host.
b. Type the port number.
c. Type the database name.
d. Optionally, in the Advanced Options field, specify additional connection parameters and their values to be included in the connection URL. Values should be entered as a semicolon-separated list of parameter=value.
18. Provide the external database credential information.
Note: Administrator credentials are only required at install time to create the database schema. Administrator credentials are not used by the product at run time.
Note: If the installer is unable to validate, you are prompted to reenter credentials or skip validation. Skipping validation is often desired when performing a silent upgrade. See Silent upgrade process for details.
In the Admin Username field, type the administrator user name. The administrator user must have certain privileges that are specific to the database vendor. For a list of required privileges, see External system databases.
In the Admin Password field, type the password for an external database administrator account.
In the Username field, type a user name. The standard user must have certain privileges that are specific to the database vendor. For a list of required privileges, see External system databases.
In the Password field, type the user password.
19. Review the Server Access Port. The Server Access Port must be opened for the load balancer. The default is 8080.
20. Take the appropriate action depending on whether you are using the On-Premises Connector.
If you are not using the On-Premises Connector, skip to the next step.
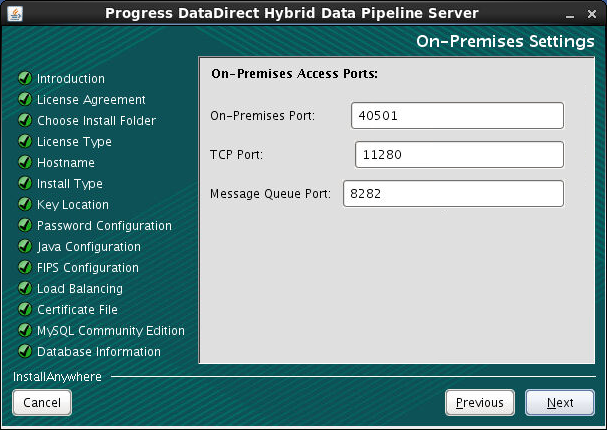
If you are using the On-Premises Connector, review the On-Premises Access Ports. The On-Premises Access Port and the TCP Notification Server Port must be opened for the load balancer.
Important: If you changed any values for On-Premises Access Ports during an upgrade, you will need to reconfigure the load balancer to use the new ports.
Table 25. On-Premises Access Ports
Name
Default
Description
On-Premises Port
40501
Port for the On-Premises Connector
TCP Port
11280
Port for the Notification Server
Message Queue Port
8282
Port for the message queue
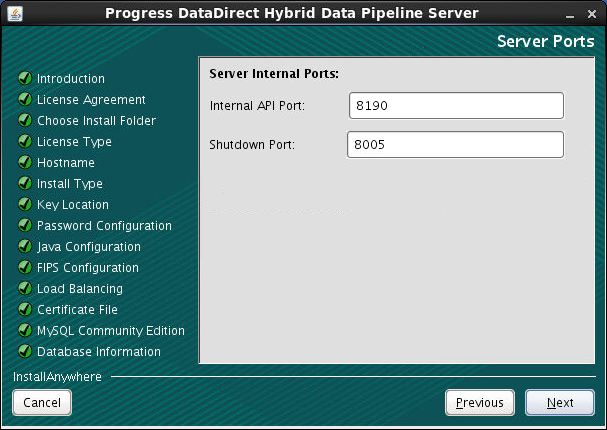
21. Review the Server Internal Ports. The Internal API Port and the Shutdown Port must be opened.
Important: As a matter of best practice, the Shutdown Port should not be available outside the firewall of any Hybrid Data Pipeline instance.
Table 26. Server Internal Ports
Name
Default
Description
Internal API Port
8190
Non-SSL port for the Internal API
Shutdown Port
8005
Shutdown port
22. Review the installation summary. If you are satisfied with your choices, press ENTER to upgrade.
23. After the upgrade has finished, press ENTER to exit the installer.
24. Verify the upgrade by accessing the Hybrid Data Pipeline user interface from a browser. The login page should appear. For example:
https://<myserver>/
where <myserver> is the fully qualified hostname or IP address of the load balancer.
After logging in, administrators can verify product version information by selecting About from the question mark drop-down menu. For more information on retrieving version information, refer to "Get Version Information" in the Progress DataDirect Hybrid Data Pipeline User's Guide.
Refer to installation log files for a record of any problems that may have occurred during the upgrade. See Server installation log files for details.
What to do next
If you changed any values for On-Premises Access Ports during an upgrade, you will need to reconfigure the load balancer to use the new ports.