1. Make the appropriate selection regarding SSL configuration based on your environment.
Important: If an SSL certificate is not specified, the installer will not generate the configuration and certificate files required for the installation of the On-Premises Connector and the ODBC and JDBC drivers.
Select Yes to specify the SSL certificate file to be used with the Hybrid Data Pipeline server. The specified file must be the root certificate used to sign the certificate for the load balancer server. PEM, DER, and Base64 encodings are supported. Type the full path to the certificate file, or click Choose... to browse to the location of the SSL certificate file. Then, click Next.
Select No if you do not want to specify an SSL certificate.
2. Select MySQL Community Edition if you plan to use MySQL Community Edition as an external system database or as a data source. Hybrid Data Pipeline does not provide a driver for MySQL Community Edition. However, you can use the MySQL Connector/J driver to use MySQL Community Edition as an external system database or as a data source. If you select MySQL Community Edition, enter the name and location of the MySQL Connector/J jar file in the Jar Path field. Then, click Next to continue.
For more information on the MySQL Connector/J driver, refer to the MySQL developer website at https://dev.mysql.com/.
3. Select the external database you want to use to store system information from the drop down menu.
c. Select the connection type. Do one of the following:
If you connect using the Oracle System Identifier (SID), select Connect using SID, then type the SID.
Select Connect using Service Name, then type the database service name that specifies the database that is used for the connection. The service name is a string that is the global database name. The global database name typically comprises the database name and domain name.
d. Optionally, in the Advanced Options field, specify additional connection parameters and their values to be included in the connection URL. Values should be entered as a semicolon-separated list of parameter=value. For example, you may enter to following options to configure SSL:
5. Provide connection information for the MySQL Community Edition external database.
a. Type the name of the host.
b. Type the port number.
c. Type the database name.
d. Optionally, in the Advanced Options field, specify additional connection parameters and their values to be included the connection url. Values should be entered as a ampersand-separated list of parameter=value.
e. Optionally, in the Advanced Options field, specify additional connection parameters and their values to be included in the connection URL. Values should be entered as a semicolon-separated list of parameter=value.
d. Optionally, in the Advanced Options field, specify additional connection parameters and their values to be included in the connection URL. Values should be entered as a semicolon-separated list of parameter=value.
8. Provide the database credential information for the external database.
Note: Administrator credentials are only required at install time to create the database schema. Administrator credentials are not used by the product at run time.
Note: If the installer is unable to validate, you are prompted to reenter credentials or skip validation. Skipping validation is often desired when performing a silent installation. See Silent installation process for details.
In the Admin Username field, type the administrator user name. The administrator user must have certain privileges that are specific to the database vendor. For a list of required privileges, see External system databases.
In the Admin Password field, type the password for an database administrator account.
In the Username field, type a user name. The standard user must have certain privileges that are specific to the database vendor. For a list of required privileges, see External system databases.
In the Password field, type the user password.
9. Review the Server Access Port. The Server Access Port must be opened for the load balancer. The default is 8080.
Note: In most cases, the default port works without problems. However, your environment might have already defined a function for the port. If the default port is in use, the installer pops up a message so that you can make the necessary changes.
10. Select whether you are using the On-Premises Connector.
Note: An SSL certificate must be specified in Step 1 to use the On-Premises Connector.
If using the On-Premises Connector, select Enable On-Premises Connector. Click Next and continue to the next step.
If not using the On-Premises Connector, leave the check box empty and click Next. Continue at Step 12.
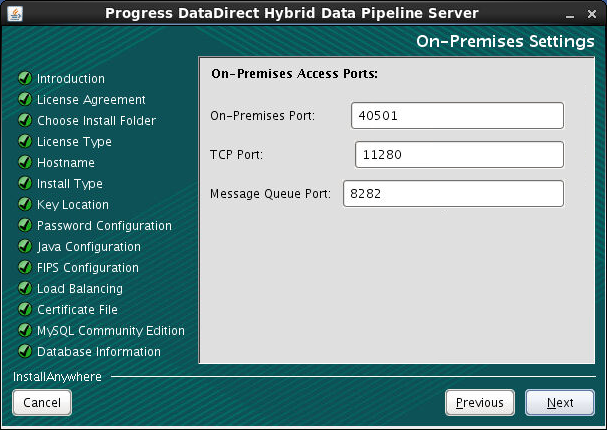
11. Review the On-Premises Access Ports. The On-Premises Access Port and the TCP Notification Server Port must be opened for the load balancer.
Note: In most cases, the default ports work without problems. However, your environment might have already defined a function for one or more of the ports. If a default port is in use, the installer pops up a message so that you can make the necessary changes.
Table 4. On-Premises Access Ports
Name
Default
Description
On-Premises Port
40501
Port for the On-Premises Connector
TCP Port
11280
Port for the Notification Server
Message Queue Port
8282
Port for the message queue
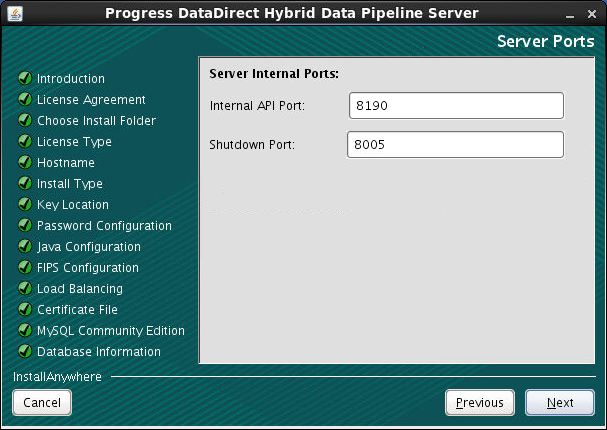
12. Review the Server Internal Ports. The Internal API Port and the Shutdown Port must be opened.
Important: As a matter of best practice, the Shutdown Port should not be available outside the firewall of any Hybrid Data Pipeline instance.
Note: In most cases, the default ports work without problems. However, your environment might have already defined a function for one or more of the ports. If a default port is in use, the installer pops up a message so that you can make the necessary changes.
Table 5. Server Internal Ports
Name
Default
Description
Internal API Port
8190
Non-SSL port for the Internal API
Shutdown Port
8005
Shutdown port
13. Review the installation summary. If you are satisfied with your choices, click ENTER to install.
14. After the installation has finished, press ENTER to exit the installer.
15. Verify the installation by accessing the Hybrid Data Pipeline user interface from a browser. The login page should appear. For example, type:
https://<myserver>/
where <myserver> is the fully qualified hostname or IP address of the load balancer.
After logging in, administrators can verify product version information by selecting About from the question mark drop-down menu. For more information on retrieving version information, refer to "Get Version Information" in the Progress DataDirect Hybrid Data Pipeline User's Guide.
Refer to installation log files for a record of any problems that may have occurred during the installation. See Server installation log files for details.
What to do next
During installation, the installer generates four configuration and certificate files. These files will be located in the redist subdirectory of the key location you specified in Step 10 in "GUI mode installation." Before installing a component such as the ODBC driver, the JDBC driver, or the On-Premises Connector, these files must be copied to the installer directory of the component you are installing.
Note: If an SSL certificate was not specified in Step 1, the installer will not generate the configuration and certificate files required for the installation of the On-Premises Connector and the ODBC and JDBC drivers.