LoginDlg.cls is an implementation of an ABL Dialog form. An ABL Dialog is a modal dialog that has OK and Cancel buttons that are pre-coded with event logic.
To add LoginDlg.cls to the project:
1. Expand the openedge node in the SampleApp project.
2. Right-click on the ui node.
3. ChooseNew > ABL Dialog.
4. In the New ABL Dialog wizard, type LoginDlg in the Dialog name field.
5. Click Add (next to the Implements field).
6. Add IStyling - openedge.tutorial.ui, IUser - openedge.tutorial.ui, IHelpCallback - openedge.tutorial.ui from the Matching types list in the Interface Selection dialog.
These interfaces add the templates of the methods required to support the custom controls in the project. You will add these custom controls (HelpButton, LeftBar, and LoginBlock) to the login dialog.
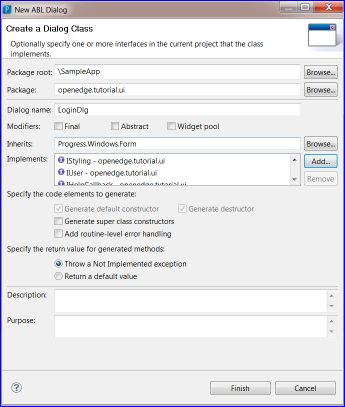
7. Click OK. The ABL Dialog wizard appears and should look similar to the following:
8. Click Finish.
9. In the Properties view of LoginDlg.cls, set Text to Login.
10. In the Properties view of LoginDlg.cls, set Size to 595, 320.
As you add custom controls to LoginDlg.cls, you might want to adjust the size again.
11. From the OpenEdge Ultra Controls group in the Toolbox, drag and drop AppStylistRuntime on the LoginDlg.cls form.
AppStylistRuntime is a non-visible control that applies styles for an application at runtime. These styles are defined in the three style library (.ils) files that are located in the /styles folder of the SampleApp project.
You can create style libraries with the NetAdvantage® AppStylist® tool. For more information, see:
Remember that each style library file is associated with a particular item in the Appearance group in LeftBar. When you choose an item in the Appearance group at runtime, the style of the application changes.
12. Drag and drop LeftBar from the My Controls group to the left side of the LoginDlg.cls form.
13. Drag and drop LoginBlock from the My Controls group to the right side of the LoginDlg.cls form. Align it to the top of LeftBar.
14. Drag and drop HelpButton from the My Controls group to the bottom of the LoginDlg.cls form. Align it to the left of the OK button.
15. In the Properties view of helpButton1, change Text to a question mark (?).
16. Adjust the size of the form and the alignment of the controls on the form.
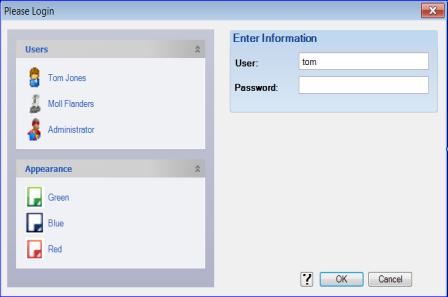
LoginDlg.cls look similar to the following illustration: