In this section, you will add several editors to the UltraGroupBox. Editors are user-input fields and/or display fields that you can customize to show particular data types in a particular format. After you add an editor to a form or a container, you usually add an UltraLabel to identify the editor's purpose. Finally, you align the controls with respect to each other. The Visual Designer supports most of the functionality for moving, aligning, and resizing objects that is standard on graphical editors on Windows platforms.
To add an editor to ultraGroupBox1:
1. With purchaseOrderForm.cls open in the Visual Designer canvas, expand OpenEdge Ultra Controls in the Toolbox.
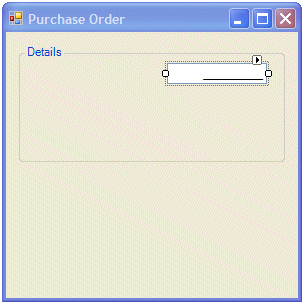
2. Select UltraNumericEditor, then drag and drop it on the Details container:
Note: The UltraNumericEditor control supports INTEGER and INT64 data types. It also supports feature masking to format data input and display.
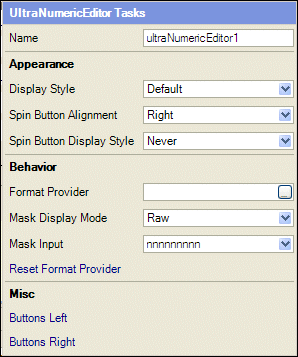
3. Open the Smart Tag panel by clicking the Smart Tag arrow on the UltraNumeric Editor control.
4. In the Smart Tag panel, change Mask Display Mode to Raw and Mask Input to Integer 1 (nnnnnnnnn):
Note: In this tutorial, you leave the default names on controls (ultraNumericEditor1, ultraNumericEditor2, etc.). You can easily give controls more meaningful names by changing the Name property. However, do not change the default names in these exercises because the code for the sample application depends on the defaults.
5. Dismiss the Smart Tag panel by clicking outside of it.
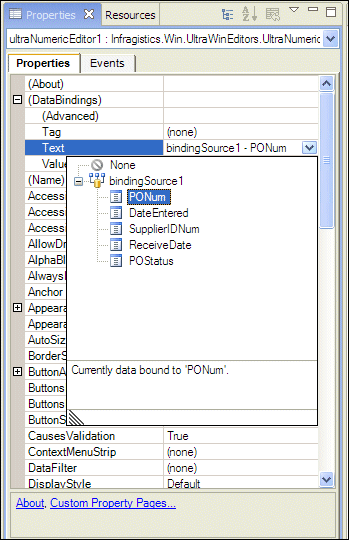
6. With ultraNumericEditor1 selected, find and expand (DataBindings) in the Properties view.
7. Under bindingSource1, choose PONum, from the drop-down menu in the Text field as shown in the following illustration:
This step binds the control to the correct field in the ProBindingSource.
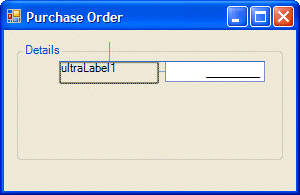
8. From the OpenEdge Ultra Controls control group in the Toolbox, select UltraLabel1 and drop it to the left of the ultraNumericEditor1 control:
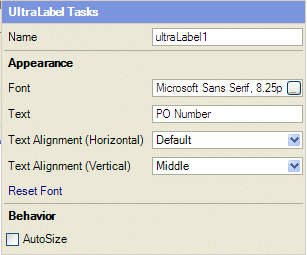
9. In the Smart Tag panel of ultraLabel1, change Text to PO Number and Text Alignment (Vertical) to Middle:
10. Change the size of UltraLabel1 and UltraNumericEditor1, if necessary.
When selected, objects on the Design Canvas display the shape handles that are commonly used in graphical editors to adjust the size of an object. Shape handles are squares distributed along the perimeter of a graphical object, as shown in the following illustration:
When you hover over a shape handle, an arrow appears. The arrow indicates the direction that you can expand or shrink a shape.
11. Select both ultraLabel1 and ultraNumericEditor1 on the Design Canvas. You can do this by clicking on UltraLabel1, and then CTRL-clicking on UltraNumericEditor1. Or, you can place the cursor above and to the left of the two controls, hold down the primary mouse button and draw a marquee around the two controls.
12. With both controls selected, choose Design > Align > Vertical Centers from the main menu bar. This step centers the text of ultraLabel1 with the rectangle created by ultraNumericEditor1.
13. Save purchaseOrderForm.cls.
As you add more controls to the Purchase Order form, you will probably need to adjust the size and alignment of the controls within the form. Use your own judgment to give the user interface an uncluttered, balanced, and attractive look. You can also experiment with the various properties that are available for each control, such as appearance, color, font, and style.
The following table lists the remaining editors and labels to add to ultraGroupBox1.
Table 1. Remaining editors for the Details section
Editor
(Databinding)/Textproperty
MaskInput property
ultraLabel Text property
UltraTextEditor1
POStatus
NA
Order Status
UltraNumericEditor2
SupplierIDNum
Integer 1
Supplier ID
UltraDateTimeEditor1
DateEntered
Date 1
Date Entered
UltraDateTimeEditor2
ReceiveDate
Date 1
Date Received
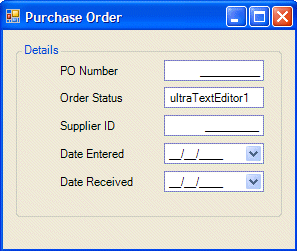
After you add and align all the editors and labels, the Details section of the Purchase Order form should look similar to the following figure.
Figure 13. The Details section of the Purchase Order form