Running the Shared Network Installation Utility to set up a client connection
The Shared Network Installation Utility (NetSetup) updates each client machine with all system files, icons, and registry entries needed to launch OpenEdge locally. Each client can then share the networked copy of OpenEdge.
The client machine in a NetSetup installation uses the OpenEdge installer located on the network server. The installer software enables you to locally launch NetSetup.
Note: Uninstall any existing OpenEdge product that is currently installed on a client machine to which you are installing. For information on uninstalling, see UninstallingOpenEdge in Windows.
To run NetSetup on your client machine:
1. ChooseStart > Run. The Run dialog box appears.
2. In the Open field, type one of the following supported connection options to connect the client machine to the shared network server:
a. To identify a mapped drive connection, type:
drive:\destination path\netsetup\setup.exe
The destination path is the same path where OpenEdge is installed on the server machine.
The destination path is the same path where OpenEdge is installed on the server machine.
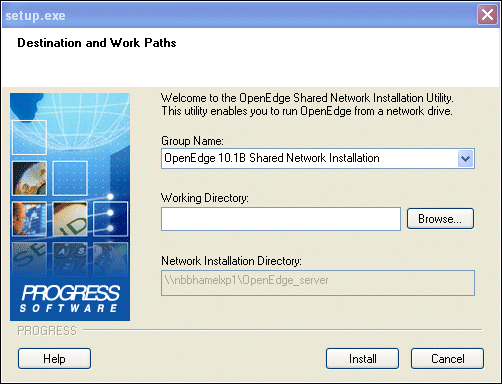
3. Choose OK. The Destination and Work Paths dialog box appears:
4. Accept or change the program group name that appears in the Group Name field. The Group Name value identifies the menu option label that appears on the client machine. When you select this name from All Programs, you can access the OpenEdge installation that resides on the network server.
Note: If the group name does not already exist, the NetSetup utility adds the group name to All Programs.
5. Type the absolute path or browse to find the file to identify as the client-based working directory in the Working Directory field. The Working Directory is a local folder in which OpenEdge places the files you create on the client.
6. Review the pathname information that appears in the Network Installation Directory field. This pathname identifies where OpenEdge is installed on the network server.
Note: The Network Installation Directory field always appears grayed out, confirming that the information that appears in this field cannot be changed. The pathname that appears in this field identifies two pieces of information: where OpenEdge is installed on the network server and the type of connection that you are using to share the network installation (that is, mapped drive or UNC pathname).
7. Choose Install. Select the Group Name you defined from All Programs to access the OpenEdge installation from the network serve.
Note: If you change the original installation on the network, and the installation includes additional shortcuts supported by the NetSetup Utility, you must uninstall and reinstall the NetSetup Utility on the client to ensure that the shortcuts are available on the client machine.