So where do you enter this little piece of code? First, you need to start an OpenEdge session, create and connect to a copy of the sample database the example uses, and then bring up the Procedure Editor.
To start your OpenEdge session:
1. From the Windows desktop Start menu, select the OpenEdge environment, using whatever name you gave to it when you installed it, and under that menu item, select the Client option. For example, select Start > Programs > OpenEdge > Client.
The Procedure Editor window appears. From here you can access all the basic OpenEdge development tools.
Note: Starting with OpenEdge Release 11.0, you can also access the Procedure Editor from within the Progress Developer Studio for OpenEdge development environment (Start > Programs > OpenEdge > Progress Developer Studio for OpenEdge).
2. From the main menu, select Tools > Data Dictionary.
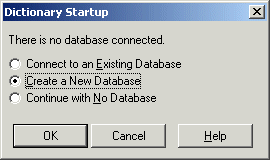
The OpenEdge Data Dictionary Startup dialog box opens. The Data Dictionary is where you define and manage all the tables and fields in your application database. To get you started, you can create your own copy of the Sports2000 database, which is the standard OpenEdge demo database. You need to copy the database so that your test procedures can make changes to it without modifying the version of it in your install directory.
3. In the Dictionary Startup dialog box, select the option to create a new database, then click OK:
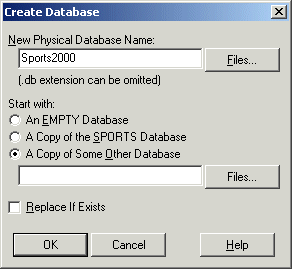
The Create Database dialog box appears and prompts you for the name of your copy of the database.
4. Type Sports2000. By default, OpenEdge creates a database named Sports2000 in your working directory. If you'd like the database to be somewhere else, you can click the Files button next to the New Physical Database Name fill-in field to browse the directory structure for the right location for your database.
5. After you've entered your new database name, select the Start with A Copy of Some Other Database option, and then click the Files button next to the fill-in field:
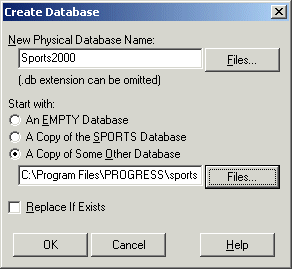
6. Locate the Sports2000 database in your OpenEdge install directory, then either double-click that entry or click the Open button:
The pathname to the database is filled in when you return to the Create Database dialog box:
7. Click OK to accept this pathname. The Connect Database dialog box appears.
8. Make sure the Physical Name field shows Sports2000 and the Database Type is OpenEdge. Click OK.
Because you created this database as part of the Data Dictionary startup, which needs to have a database connected before it lets you in, the Data Dictionary main window now opens.
To familiarize yourself with the Sports2000 database tables:
1. Select the Customer table from the Tables list, then click the Fields button on the Dictionary's toolbar:
All the fields (or columns, to use the equivalent SQL terminology) in the table are shown in the Fields list to the right.
2. Scroll through the list to see all the fields in the table. You'll be displaying a few of these fields later, and using others to select a subset of the Customers for display. Notice in particular the CustNum field which gives a unique number to each Customer.
3. Scroll down the list of Tables, then select the Order table.
You can see that there is an OrderNum field, which gives each Order a unique number. Notice also that, as in the Customer table, this table includes a CustNum field. You will use this field in UsingBasic ABL Constructs to link, or join, the Order table to the Customer record with the same CustNum value.
There is much more to see in the Dictionary. If you want to wander around in the displays, go ahead, but just don't change anything! Any changes you make might affect steps later in this tutorial. If you make changes to tables or fields, this might invalidate records that are already in the sample database or keep some of your later example procedures from working.
4. To leave the Data Dictionary, select Database > Exit from the Dictionary menu.
You remain connected to the database until you go back to the Data Dictionary and disconnect from the database or until you end the OpenEdge session.