Some ODBC applications display a Logon dialog box when you are connecting to a data source. In these cases, the data source name has already been specified.
Note: The Logon Dialog is not displayed if Authentication Mode has previously been set to Kerberos and the Host Name is specified in the data source.
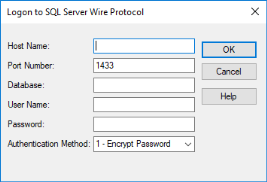
In the Logon dialog box, provide the following information:
1. Type an IP address in Host Name in following format: IP_address. For example, you can enter 199.226.224.34.
The IP address can be specified in IPv4 on Windows, and in either IPv4 or IPv6 format, or a combination of the two, on UNIX. See "Using IP Addresses" for details about these formats.
If your network supports named servers, you can specify an address as: server_name. For example, you can enter SSserver.
To specify a named instance of Microsoft SQL Server, use the format: server_name\instance_name. If only a server name is specified with no instance name, the driver uses the default instance on the server.
2. Type the Port Number of the server listener. The default is 1433.
3. Type the name of the database to which you want to connect. If you do not specify a value, the default database that is defined by Microsoft SQL Server is used.
4. Type your Microsoft SQL Server login ID.
5. Type your password.
6. Select an Authentication Method:
If set to 1 - Encrypt Password, the driver sends the user ID in clear text and an encrypted password to the server for authentication.
If set to 4 - Kerberos, the driver uses Kerberos authentication. This method supports both Windows Active Directory Kerberos and MIT Kerberos environments.
If set to 13 - Active Directory Password, the driver uses Azure Active Directory (Azure AD) authentication when establishing a connection to an Azure SQL Database data store. All communications to the service are encrypted using SSL.
7. Click OK to complete the logon and to update the values in the Registry.