The Studio installer will install or update Studio 5.6.x.
Installing or updating Studio 5.6.x
To perform a new installation of Corticon Studio 5.6.x:
1. Double click on the installer file, PROGRESS_CORTICON_5.6.1_STUDIO_WIN_64.exe, to launch the Corticon Studio installer.
The installer opens in the installer wizard.
2. The first installer panel opens with information about the installer.
3. Click Next to continue.
The License Agreement panel opens.
This panel displays the Progress Software End User License Agreement (EULA). Use the scroll bar at the right of the screen to read the agreement content.
4. When you understand and agree to the terms, choose I accept the terms in the license agreement, and then click Next to continue.
The Choose Install Folder panel opens.
5. Specify the installation location. The default location for the installation directory and the work directory are as shown above. (For the work directory, the default subdirectory under Users is the current username.) Either accept the default locations, or specify each preferred (and different) location.
6. If you see the upgrade panel instead, Corticon Studio is already installed. You cannot change its install location or bind it to a different Eclipse such as PDS OE without doing a complete uninstall and re-install.
7. Click Next.
8. The installer attempts to discover an existing Progress Developer Studio for OpenEdge on the machine. If the Eclipse/OpenEdge version are compatible, and if the installer is the corresponding bit width, the following panel opens:
If this panel is displayed, choose whether to add the Corticon Studio plug-ins into that Progress Developer Studio for OpenEdge location to get the benefit of a tailored installation, and then click Next to continue.
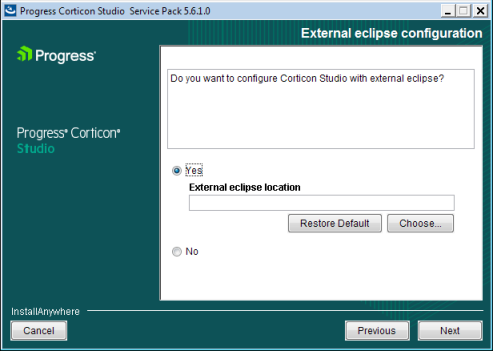
9. If you had no Progress Developer Studio for OpenEdge installation, or passed on installing into a discovered Progress Developer Studio for OpenEdge, the External eclipse configuration panel opens:
If you select Yes on this panel, the entry area for the External Eclipse location in which you want to add Corticon Studio (in addition to a standard installation) is presented: Enter or browse to the location of the Eclipse target that is the same bit width as the installer you are running.
If you leave the selection as No, a normal installation will proceed.
When you have decided which path to take, click Next to continue.
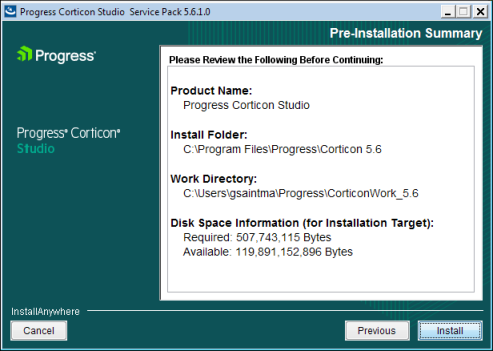
10. The Pre-installation Summary panel opens.
Confirm that your installation location has adequate disk space for the Corticon Studio components as well as at least 100 MB of workspace.
11. Click Install to continue.
An installation status window opens to display the state of the installation process. When the process has finished, the Install Complete panel opens.
12. Click Done to quit and close the installer.
The installation or update of Corticon Studio 5.6.x is complete.


 Enter or browse to the location of the Eclipse target that is the same bit width as the installer you are running.